Took these last night, haven’t been in front of the camera in 3 months and it felt really strange at first but it was so nice to be creative again and play with light and reflection. Oh and I have cute curly hair again haha
One light set up, full military wear to go with the buzzcut. I got this idea after someone suggested it in my DM's, it's always fun to play around with different lighting set ups and outfits :)
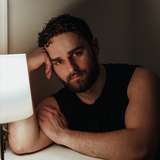
New NSFW shoot in a bodysuit not leaving much to the imagination, I love how this shoot turned out. Very dramatic lighting coming from the window and beautiful shapes showing off the body.
I used to know, but I'm not so sure now.
I used to be so certain of the things that were meaningful to me but now I’m not so sure anymore.
I miss being an artist.
I miss writing.
I miss creating.
I miss parts of the person I used to be.
We all have things that make our life meaningful and I thought I had mine figured out but are they really what I want or are they what I thought I wanted because they’re all I’ve ever known?
My latest shoot with @ema210m and Den Loungewear. We really wanted these photos to feel very bright, warm and summery. If you have a look, even the blues in these photos as well as the greens and the skin tone have a yellow tone to them. I've also used colours that are opposite on the colour wheel to create a little more contrast in the photos. The main composition that I've used is the rule of thirds.
My latest uncensored shoot with @ema210m .Dramatic lighting, very sexy nudity and different angles. A lot of these photos feel very intimate to me, it's like watching something you shouldn't be watching. Check them out ;)
A very dramatic hotel stay. These new shots coming on my insta next week. The composition that I've used is the rule of thirds. I also made the room very dark so there are no distractions, all the eye focuses on is the middle of the photo.
I first took the second photo but it felt very basic and it felt to me like it was lacking something so I then used the curtains to create more movement and add more drama to the photograph and that was the outcome. I hope you like them as much as I do. :)
Have we been the person we desired to be, or were our choices dictated by other peoples?
Did we quench all our desires?
Do we accept and embrace our fantasies?
Have we given ourselves the possibility to experience our very own dreams?
Have we done everything we could to be our inner selves?
I wanted this photo to feel uncomfortable so I used a lot of movement as well as using lines that aren't straight. The lighting is also very dramatic and it comes from the window that is slightly open. Even though I wanted it to feel uncomfortable I also wanted it to feel warm so I used yellow tones for the highlights.
New photoshoot coming next week! Super simple shoot with one light source which is the window coming from the side. The composition that was used was rule of thirds. This is literally the easiest shoot that you can do if you want to start your self-portrait journey. All you need is a window, a camera and a tripod and some good music to get your energy up. :)
New post coming today!
I wanted to use really desaturated tones for this as I wanted the photographs to have a sense of softness. I also wanted to Eiffel Tower to feel like a photograph in a photograph so I decided to use the train station to frame tower.
I also think that adding the Eiffel Tower in the background created foreground interest which leads the viewer's eyes through the photograph. If the photograph had just a blue background I think the photograph would feel a lot more 2D.
Furthermore, adding something in the photograph that indicates where the subject is creates more of a story and give the viewer context to the photograph. There should be an involvement between your subject and the background in full body self-portraits if you'd like to create a story and to give clues to the viewer.
New Shoot coming out this week.
This lighting, I feel like it's my signature lighting. Very harsh sunlight on the side of the face with some light reflecting onto the left side from the white wall but mainly shadow. The composition technique that I used can make a photograph very basic as all that there is in the frame is the subject so adding dramatic lighting can definitely add some layers to your photograph and make it more moving rather than still. If you want to use this lighting one tip that I'd give is to have a white reflector or a white wall reflecting some of the harsh light back onto the other side of the face as otherwise it can be very dark. However, if you want it to be dark than that can also be very interesting. Create the art you want to create.
New Photoshoot. The most important thing in this photograph is the colour of the jumper. Because the red is so bright it instantly draws the viewer's eye. I also like the lines of the wall because it draws your eyes to the subject and then the lines from the legs lead to the red jumper.
The light that was used here was natural side light. Because the walls in the room are white the light reflects onto them which creates very soft light. As you can see on my right there are some shadows because my body is blocking the side light. However, I find this to be really useful as it adds more depth and layers to the photograph.
In terms of colour grading, Red, Green and Orange are next to eachother on the colour wheel so they work great together. If there was blue in the photo you could also play around with Blue, Red and Green but because there isn't, to make all the colours link together using colours that are next to eachother was easier. What I did is added a tint of Green in the highlights and then you have the red jumper and the orange from my legs.
P.S: I suck at drawing which is why I'm a photographer lol.
There are two main types of light that photographers use.
High-Key light
Most of the photographs you see in magazine or advertisements use high-key light. The photos are bright and well lit and they often have very few shadows. However, they have enough shadows for the photograph to look real because that’s what makes products stand out and what sells.
Low-Key light
On the other hand, low-key light is the very dark lighting that requires a tripod or a longer shutter speed. Night photography uses low-key lighting and if done properly it can create beautiful pieces of art.
New Photoshoot coming this week. Very natural sunshine defused by the clouds which turns it really soft and the composition technique that was used was the rule of thirds.
Trousers are from H&M
Jumper is from Zara
Shoes: DrMartens
Shirt: M&S
Back Lighting
Back lighting is by far the hardest to work with at the beginning because it requires knowledge on how to use your phone camera or how to use the manual setting on your professional camera. Compared to the other two sets of light this one pushes all the shadows onto the subject’s face, meaning that it can either turn the subject into a black silhouette if the subject is underexposed or it can make the subject stand out if the background is overexposed. By overexposing the background all of the light shadows are in the front of the subject which will make the subject’s face light and the background white. By underexposing the subject all the light shadows move onto the background which will turn the subject into a dark silhouette and will make the background lighter. This is more complicated however backlighting can create incredible photos.
Side Lighting
A good way to make sure that the photo isn’t flat or boring is to place the light source on the side of the subject. This will create a lot more depth to the photo as it will form shadows onto the subject’s face. The most important thing to consider with side lighting is where the shadows fall, the light doesn’t always need to be 90 degrees. Be careful where the shadows fall and what the subject’s best features are because when the light is placed correctly the shadows can make those features stand out and make the overall photo more flattering/interesting.
Front Lighting
Place the light source in front of you, this will make the shadows fall behind you, which will bring out the details of your face as there won’t be any shadows on you to cover any details. This is a very easy way to shoot a subject because their face will be sharp, however the photo can turn out to be very flat and boring. This is usually my go to for selfies as well as product photography.
I think the easiest way to understand the positioning of light is by doing this exercise. Go to a completely dark room with a mirror, light a candle and stand in front of the mirror. (I know this is how every horror film starts but I promise it’s not a scary exercise) Wherever that candle is in relation to yourself will determine the positioning of the light in your photograph as it’s the only source of light you have. Remember that sometimes you can move the light source and other times you have to move the subject to alter the position of the light or to change the mood of your photograph. For this exercise we will only move the light source so you can watch the effect it has in the mirror.